The Business Card Example
We are going to build a widget from an existing ICEC widget. We will create a copy of an existing widget, and to the content already provided in it by IBM Connections we will add data coming from an external content source.
1. Create a new widget
In a Visual Studio Code terminal window make sure that you are in the icec-widgets-starter directory. Issue the following command:
node scripts/createWidget.js bcard custom
We are going to make a copy of the Business Card widget and modify it using the following steps:
- Click on the nagivation link for Business Card to be taken to that page. Validate by looking for the page title and the
?page=bCardin the URL displayed by the browser. - By default, all widgets that are loaded on an ICEC page are minimized, so we need to make a copy of the non-minimized version.
- Add the
&xccdebug=trueparameter to the URL to force a download of non-minimized versions of all widgets on the current page:https://apps.na.collabserv.com/xcc/cloud?page=bCard&xccdebug=true. - Press Enter to refresh the page with the new parameter.
- Add the
- Click Customize > Widgets > Create Widget.
- Select the
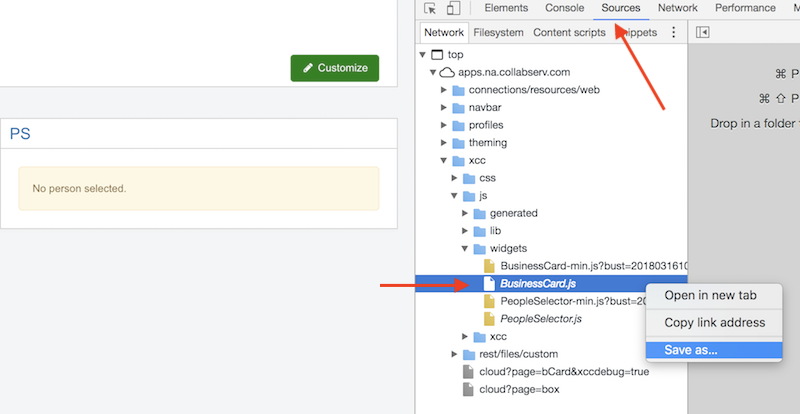
People Selectorwidget from the list. In the ID field, enter a unique name PS and click Create. - Open the Developer Tools in your browser and change to the
Resourcestab. - Expand apps.na.collabserv.com > xcc > js > widgets.
- Right-click
BusinessCard.jsand select Save to download the widgets. - Save the widget to
/src/widgets/BusinessCard/index.js, overwriting the one already there.
2. Initialize the widget
The default widget comes with a set of JavaScript modules and build tools pre-configured. We need to install them. Switch to the directory that was just created and run npm install.
cd src/widgets/bcard

npm install
3. Modify the widget
In the left navigation for Visual Studio code, expand the src/widgets/bcard folder. If you do not see the folder, click the refresh icon on the top right to update your folder list.
-
Click on
index.jsto modify it. -
First modify the section in green to comment these lines that we no longer want to show on a business card.
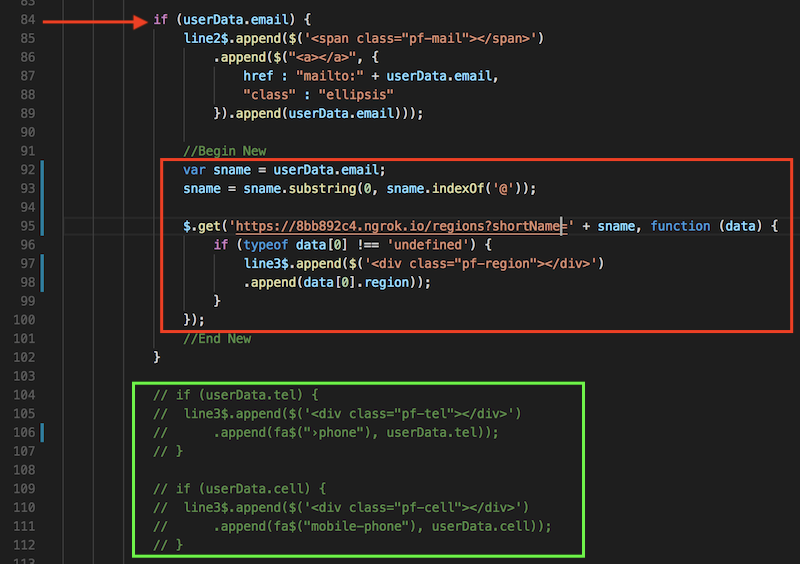
- Copy and paste the following JavasSript to add in the section in red. Make sure to specify your development server’s URL.
var sname = userData.email;
sname = sname.split("@")[0];

$.get('https://8bb892c4.ngrok.io/regions?shortName=' + sname, function (data) {
    if (typeof data[0] !== 'undefined') {
        line3$.append($('<div class="pf-region"></div>')
        .append(data[0].region));
    }
});
- Save the file.
4. Build the widget
We need to preserve some information on the original widget we copied; i.e., the originalName that is used by ICEC to register that widget. In your Chrome browser developer console, type the following command XCC.requirejs.s.contexts._.config.paths and press Enter. Expand the resulting object:
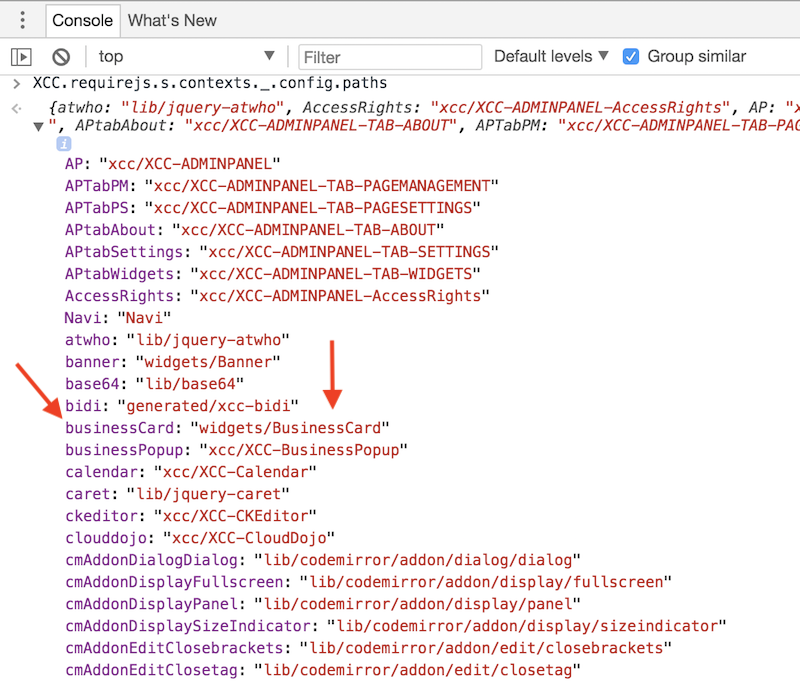
The BusinessCard is the widget we are modifying, and the internal name used by ICEC is businessCard, as seen in the screen shot above.
Back in Visual Studio Code, in the left navigation, expand the src/widgets/bcard folder.
-
Click on the
webpack.config.jsto modify it. -
In the widgetName variable, specify the name as
businessCardand change the next line to usewidgetNameas seen below.

- Save the file.
In order to make the widget available to ICEC we are going to run a build task that packages all the required files and deploys them to our Development server under the /build/public directory and also under the dist directory.
- Issue the following command from a terminal window while in the
src/widgets/bcarddirectory.
npm run build
-
In the Visual Studio Code Explorer, on the left panel, navigate to
src/widgets/bcard/distand review the files there. -
Repeat the above step for the
build/publicfolder. -
This widget is pure JavaScript with the HTML code inside of it, so only the .js files are produced.